There are volumes of materaials written about Model Railroading including monthly magazines, books, dedicated websites and collecting & operating clubs from which gather to information. Some are simple to follow while others require knowledge of the hobby to understand all of the details explained by the authors.
This piece is written as a primer to the hobby. Not too much knowledge is assumed herein and the sole purpose is to provide the reader with a brief introduction to Model Railroading with a focus on O Gauge model trains. These ideas and thoughts are for anyone interested in operating model trains for a hobby from the members of the Virginia Train Collectors Association (VTCA) but should not be read as the sole authorative source for the beginning hobbyist. It is a basic introduction – no more no less.
The hobby has been around for 100+ years and is still evolving with new technologies & concepts enhancing the play value of trains. Many of us have collected and played with trains for over 50 years.
UNDERSTANDING DIFFERENT SCALES OF TRAINS
Model Trains come in many sizes characterized by the term “Scale”. Scale is measured by a ratio of 1 to the actual size of the prototype of the real train. The most common scales are:
| Model Gauge | Proportion Ratio | Rail Gauge |
| Standard | varies* | 2.125 inches (made mostly before 1940, some reissues) |
| G | 1/25 | 1.75 inches |
| O | 1/48 | 1.25 inches |
| S | 1/64 | 0.875 inches |
| HO | 1/87 | 0.625 inches |
| N | 1/160 | 0.375 inches |
| Z | 1/220 | 0.25 inches |
G Gauge manufacturers include LGB, Bachmann, USA Trains, Lionel, & Aristocraft.
Standard Gauge does not have specific scale but it fits between G and O Scale. Lionel started making Standard Gauge from 1907 to 1940 along with Ives, Boucher, American Flyer and Dorfan. In the last twenty years MTH and others have reissued some of the prewar models with new electronics.
O Gauge current manufacturers include Lionel, MTH, Williams by Bachman & Atlas. Former manufacturers include K-Line, Marx, Kusan, Bing, Dorfan, Joy Lines, Hafner & Right of Way, to name a few.
S Gauge manufacturers include American Flyer, S-Helper Service, and American Models.
HO current manufacturers include Bachmann, Walthers, Atlas, Athearn by Horizon Hobby, Bowser, Broadway Limited Imports, Roundhouse, Kato, Marklin, & Model Power to name a few. Former HO manufacturers include AHM, Lionel, Tyco, and Mantua.
N manufacturers include most of the HO manufacturers listed above.
Z manufacturers include American Z Line, Marklin and Micro Trains.
There are also some other types of model trains such as On3 which is an O Scale train designed to run on HO track and 1 Gauge (mostly European) that has a ratio 1 to 32.
The choice of scale depends on your interests, available space and modeling skill level. A smaller scale is not always cheaper.
THE DIFFERENCE BETWEEN O SCALE AND O GAUGE
Many in the Hobby will intermingle the terms O Scale and O Gauge. O Scale refers to how many model trains it would take to make a real one (1 to 48) while the gauge is the measure of the track width (1.5 inches).
Hobby purists view O Scale as a designation of trains and rolling stock that have been made to the exact 1:48 Scale. Anything other than true to 1:48 scale is often referred to as semi-scale or O Gauge (a source of confusion to the outsider). A substantial portion of post-war Lionel, Williams, MTH, K-Line, Kusan, and other brands were semi-scale so they could run on smaller radius track than required by true O Scale engines and rolling stock. You will see a big difference is the price of true Scale versus semi-scale products.
There is a segment of the O Scale product (Atlas is one) that runs on DC powered two-rail track which is not compatible with other O Scale or semi-scale product (Lionel, MTH, Williams) that runs on the AC powered three-rail track. Many hobbyists will pick one or the other to focus upon.
If you decide to pursue Pre-War Standard Gauge trains made from 1907 to 1940, those model trains run on a track width of 2 1/8 inch. The track is still available today as are the trains which run using the same transformers as O Gauge.
UNDERSTANDING THE DIFFERENCES IN TRACK RADIUS
The Track Radius refers to how size of the curve that can be created using curved track of the same designation. As an example, 0-27 means a 27-inch radius, 0-31 means a 31-inch radius, 0-42 means a 42-inch radius, and the radius are available up to 0-108. The radius of the track you want to use will be determined by the size of the engines you will want to run and the size of the layout.
A 48” wide layout will accommodate 0-42 radius track as an example as an outside loop. To have an inner loop, you will have to use 0-36 radius track.
Another question often asked is how many pieces of track it takes to make a curve. The following table illustrates the differences:
| Diameter | No. of Pieces |
| O-31 | 8 |
| O-42 | 12 |
| O-54 | 12 |
| O-72 | 16 |
| O-82 | 16 |
DECIDE ON AN INITIAL SCOPE AND BUDGET FOR YOUR HOBBY
- 1. Who will be using the trains?
- 2. How often do you think you will use your trains?
- 3. Where will you run your trains?
- 4. How much space is available for your layout? The fortunate few have under-utilized basements to use. Most of us do not have that luxury and have to compromise our design to fit the space. Hint: Layouts can be built to be stored under beds when not used.
- 5. Do you want a simple plug and play layout that snaps together for occasional use with simple electronics? Or a more permanent layout on legs with multiple loops of tracks and sidings using more sophisticated power sources?
- 6. Do you want operating accessories, buildings, scenery, people, animals, trucks and cars on your layout? There is a wide range of accessories and scenery items from multiple generations of product available on the market today.
- 7. How much do you want to initially invest in your first train set or to expand upon an existing train set.
If you want to start with a simple oval of track using a Lionchief starter set from a retailer, the costs can be $400 to $600 as a realistic target to start. You can piece together a layout at a Train Show for less depending on your needs and desires.
REMEMBER – There is a large market for used trains so you can always sell some or all of your trains if you decide you do not want to stay in the hobby.
SELECT AN OPERATING SYSTEM FOR YOUR O GAUGE TRAINS
There are two primary operating systems for O Gauge Trains:
- 1. Conventional systems use the levels and buttons on the Transformer to control the speed (throttle), direction, and sounds of the train engines. Most transformers come equipped to run two sets of tracks at the same time. Most trains built from 1915 to 1995 use the conventional system. Most trains built after 1995 can run conventional systems if they have a switch to change from remote to conventional. However, the remote-control features are limited in what they can do in the Conventional system. Some Lionchief engines can not run on Conventional so if the remote-control malfunctions, those trains are no longer operational as some of us have found out the hard way.
- 2. Remote-Control systems are powered by the Transformer or some type of power pack. Most remote-control systems utilize tablets, cell phones or specialized control devices to control the speed, direction, sounds, and other features of the train. The type of device is determined by the generation of technology that is in your engine. Lionel (and some K Line engines) uses the “TMCC” system which is a radio frequency-based system while MTH uses the “DCS” system that transmits signal through the tracks.
Each system has its own set of electronic hardware that has to be purchased to run the respective engines. MTH and Lionel trains do not run on the same system and are not compatible in those respects. - 3. There are several generations of MTH (referred to as PS1, PS2 and PS3) and Lionel (referred to as TMCC, Legacy, LionChief) remote control systems. Each of these generations reflects the available technology at the time of production and they continue to evolve. Some of the control systems are not compatible with either older or newer systems from the same manufacturer.
- 4. The more sophisticated the control system with enhanced features and better quality, generally are more expensive and can be more finicky to operate as connectivity (wiring, power, and distance) becomes an issue. Carefully research and compare what you need to what is on the market and decide what you are comfortable in operating. Some folks stick to conventional systems using prewar, post war and MPC era trains to get started.
SELECT THE TYPE OF TRACK YOU WANT TO USE
All O Gauge trains will run all the different generations and makes of track that are available today. The differences in the track are appearances and the manner in which the track is connected to the Transformer. The most common choices are:
- 1. Traditional tubular tin plate three rail track from Lionel, Marx, Williams, RMT & K Line. It is more toy-like but very forgiving in setup and wiring.
- 2. More “realistic” three rail track from Atlas, Ross and Gargrave.
- 3. Pre-molded three rail track from Lionel (Fastrack), MTH (RealTrax), & Williams. This is the type of track that comes with most starter sets and is expandable with compatible switches and comparable track.
VTCA members have used different types of tracks on their respective layouts with great results. It all depends on the look you are trying to achieve.
With the selection of track, remember that each manufacturer of track and each style of track has different means to be connected to the power source either by direct soldering of wires or use of clip-on connectors depending on the type of track. Do your research to learn the differences when deciding which track you want to use.
New track can be expensive ($6 to $15 per section). Often you can find used track in good shape at a fraction of the cost of new track at Train Shows (usually under the display table on the floor). Look around and decide how much new you want to start with and if used track can be used for expansion of your layout.
In addition to traditional straight and curved pieces, there are manual or remote-controlled switches (turnouts) for adding siding or connecting two different tracks as well as control tracks for operating accessories. The turnouts are designed for the specific type of track you have chosen and cannot be intermingled (e.g., tubular track switches do not work with Gargraves, Ross or FastTrack products)
SELECT THE TYPE OF POWER SOURCE YOU WANT TO USE
For conventional operations, there are Transformers made by Lionel from the 1950’s to today that can be used. Most Transformers (models KW & ZW) are designed to control two separate tracks with 190 to 275 watts of power for the two tracks and accessories. The more accessories and lights will require more power. There are also Transformers (models LW, RW, 1033, 1034) with less wattage designed for single track operations. It is best to buy a rebuilt or service transformer as the power cords do rot if not periodically lubricated with WD-40 and the internal contacts can corrode. Replacement power cords cost around $10. Prices range from $30 for a single-track controller to $120 for a ZW with 275 watts.
There are some other manufacturers available but check whether it is an AC or DC output to determine if it will work with O Gauge.
For remote control operations, some of the older Transformers are not a good choice as their output can fluctuate more than the new remote control train electronic boards can tolerate. There are kits sold by third party vendors to control power fluctuations that can be added to these older Transformer. Lionel and MTH make transformers suitable for remote control operations. The Lionel CW-80 and the MTH Z-1000 can be used for single track operations while the Lionel ZW-L and MTH Z-4000 are examples that can power two or more separate tracks. Lionel Fastrack used in most starter sets including LionChief sets come with a plug in the wall power source for a single loop of track, so a separate transformer is not required. It is limited in the size of the loop it can power.
SELECT THE TRAINS AND ACCESSORIES YOU WANT TO USE
There is a wide range of trains representing each period that you may want to model from the Civil War era to the 21st Century. You can also mix and match your fleet to suit the scenario you have created for your layout.
O Gauge trains are often discussed in terms of when they were produced. The following are terms you will here used by dealers and hobbyist and the manufacturers during that period:
| 1915-1942 | Pre-War Era (Lionel, Ives, American Flyer, Hafner, |
| 1946-1969 | Post War Era (Lionel, Marx, KMT, Kusan) |
| 1969-1986 | MPC Era (Lionel, K Line, Industrial Rail, Weaver, Atlas) |
| 1987 – today | Modern Era (Lionel, MTH, Atlas, Williams, RMT) |
The following is a list of items you want to consider for your layout.
- 1. Locomotives – Diesel, Steam or Rectifiers
- 2. Passenger Cars – by road name and different configuration
- 3. Box Cars – different types, road names, product brands
- 4. Tank Cars
- 5. Flat Cars with vehicle and equipment loads.
- 6. Hopper and Gondola Cars with coal, gravel and sand loads
- 7. Bay Window or Cabooses
- 8. Cranes, Derricks and Boom Cars for Maintenance of Way,
- 9. Military, NASA, Disney, Polar Express, Frozen, Halloween, Christmas, Area 51 and other themed rolling stock consisting of locomotives and rolling stock.
- 10. Operating Rolling Stock including Milk and Merchandise Delivery, Coal and Log Dump, and Cattle and Horse Cars that have animated action when activated by special sections of track with controllers.
- 11. Operating Railside Accessories (with matching rolling stock) including Icing Station, Coaling Towers, Coal Loader, Gantry Cranes, Culvert Loaders and Unloaders, Barrell Loaders, and Lumber Mills)
- 12. Scenic Operating Accessories with animation including pumping oil well, construction crew, Hobo Camp, playground activities, carnival rides, billboards, crossing gates and guards, freight stations with forklifts and others controlled remotely.
- 13. Lighting includes light towers, streetlamps, beacons, and house lights. Menards and some Lionel / MTH buildings come with LED’s. Also animated LED signage from Miller Engineering.
- 14. Buildings from Menards, Lionel, MTH, Plasticville by Bachman, Downtown Deco, Woodland Scenic, Atlas, and Korber. Inexpensive cardboard model kits are also available. Plasticville produces a series of buildings for a farm.
- 15. People and animal figures; scale vehicles, tools, furniture, vegetation, industrial equipment, crates, boxes, and other decorative items for the layout. There are several manufacturers who specialize in these products.
- 16. Build mountains from foam or plaster on framing materials with tunnel portals available on eBay or from train shows.
- 17. Add motorized units like Trolleys, Speeders, Gang Car, Handcars and other Track Maintenance cars.
SELECT A LAYOUT DESIGN (TRACK CONFIGURATION)
Many hobbyists start with a 4’ x 8’ or smaller layout that can accommodate one loop of track with some possible sidings on which to place an accessory, a building, or some type of industry (lumber yard oil tanks, junk yards, etc.). They can later expand to larger sizes, often redesigning their track configuration.
Framing
The framing of the layout can range from 1”x3” or 1”x 4” to 2”x4” boards. Pine is acceptable but some hardwoods like maple or poplar wood is sturdier wood and straighter over time. The type of board you will use depends on several factors:
- 1. Are you going to be crawling around on top of the layout? Some people make their layouts very wide (i.e., 6 to 8 feet wide) which makes it hard to reach certain areas, especially if the layout is pushed up against a wall. Therefore, building the layout requires someone to crawl on the top to install track, wiring, and scenery.
- 2. Are you going to be able to reach over the layout from the edges to access a derailed car, reload an accessory or reposition people and scenery? A 3-foot reach is usually the limit for most folks.
- 3. Is there going to an excessive amount of weight on the framework from ¾” plywood covered with ½” homasote board and mountains made of wood frames and plaster? Thank about the weight per square foot when determining the best materials to use.
- 4. Another consideration is portability and reconfiguration. Some people build their layouts in modular sections that can fit through a door in case they need to move or want to add sections later in the layout development. A good module size is 3 feet to 4 feet wide and 4 feet to 6 feet long.
The key to your answer is to ensure there is stability in the framing to prevent your layout from collapsing or shifting once assembled based on how you will be using the layout.
It is recommended that your cross brace your framing about every 16” to 24” to provide stability and support the top cover on which someone may crawl.
Legs
The legs connected to the frame need to be high enough to allow the modeler to crawl under the layout for wiring and repairs while being low enough to allow young visitors to see the trains in action at eye level. Either 2” x 2” or 2” x 4” legs can be screwed into the framework. If you are not ready for legs, use cinderblocks, sawhorses, or some type of table.
Platform (cover surface or tabletop)
The top cover (or platform) for the layout can be plywood (1/4” to ¾”), homasote board (good for sound absorption), rigid 1” or 2” foam insulation board (good for sculpting out creeks and hills) or a combination of any of the three depending on the application.
The type of materials will depend on whether you will need to crawl on top of the platform for either installation or maintenance; the type of landscaping you want to include in your layout; and the price of materials.
A basic Fast Trak O-36 track oval needs an area of 3’ x 5’ which fits under a bed.
Some hobbyists choose to forgo the platform and set up their track on the floor for an operating session.
Scenery and Accessories
Your layout can feature industries on siding, track crossovers, elevated tracks, mountains, forests, farms, towns and neighborhoods.
You can add operating accessories from Lionel, MTH, K Line, American Flyer, and others that provide animated activities.
You can dedicate part of your layout to a natural landscape without any train tracks.
There is a wide variety of current and used items that can go into a layout. Look on the internet at what other people have done to decorate their layout and adapt your own ideas. Products are readily available from local or internet-based dealers, train shows, and eBay. Make sure you compare prices before selecting.
Wiring
In the Track section above, we discuss there are different types of wiring required for the different types of tracks. Wiring has gotten very expensive over the last five to ten years so that needs to go into your budget.
Please do some research on the internet about wiring the type of track you want to use with the type of Transformer or Power Block you will be using. It is important to get instructions for your Transformer as there are specifications for wiring the track off certain terminals and wiring the accessories off other terminals or a different Transformer depending on the current draw.
Completing your layout.
In the hobby, most of us consider our layouts as never complete – they are always a work in progress as ideas, new products and interests evolve. There is also something for everyone in the family to do on a layout so make sure to involve the family and friends.
Layout Designs
Search “O Gauge Train Layouts” on the internet to find dozens of track plans and hundreds of layout photos like the ones below:
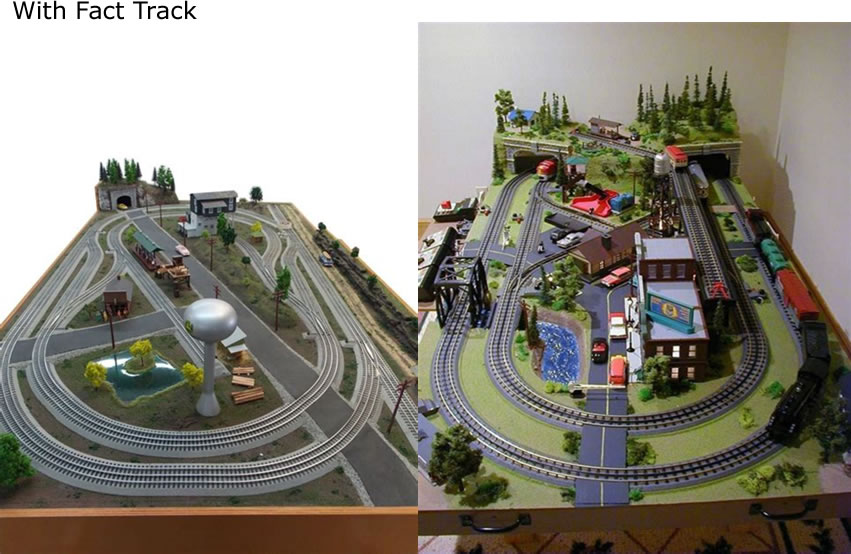


These are all 4’ x 8’ smaller layouts. The possibilities for your train empire are only as limited as the space you have available (just what basements were made for); your imagination; your willingness to experiment; your patience as you develop a wide range of skills; and your initial and long-range budget. Some beginners will use 3 4-foot x 4-foot modules to create a straight 12-foot run or make a “dog leg” with a 4-foot x 4-foot module in the middle and the other two modules are right angles to create a different perception of the space.
Leave a Comment